UPDATED 3/24/2025: Changing the size of partitions in Windows 11 is an essential skill for managing your disk space effectively. Whether you aim to redistribute storage capacity or make more space available for specific applications, this guide will equip you with the knowledge to resize partitions as needed while safeguarding your data.
Windows 11 offers various intuitive methods for resizing partitions without the risk of data loss. You can utilize the Settings app under “Disks & volumes”, Disk Management, Command Prompt, or PowerShell. Each method offers unique benefits depending on your comfort level and preferences.
Let’s get started with the detailed steps to shrink or extend your partitions on Windows 11.
- Change partition size with Settings
- Change partition size with Disk Management
- Change partition size with Command Prompt
- Change partition size with PowerShell
Change Partition Size with Settings in Windows 11
To adjust the size of a partition using the Settings application, follow these steps:
-
Open Settings on Windows 11.
-
Select System from the sidebar.
-
Navigate to the Storage tab.
-
Scroll down to find Advanced storage settings and click on it.
-
Choose Disks & volumes.

-
Select the drive containing the partition you wish to resize.
-
Click on the Properties button for that partition.

-
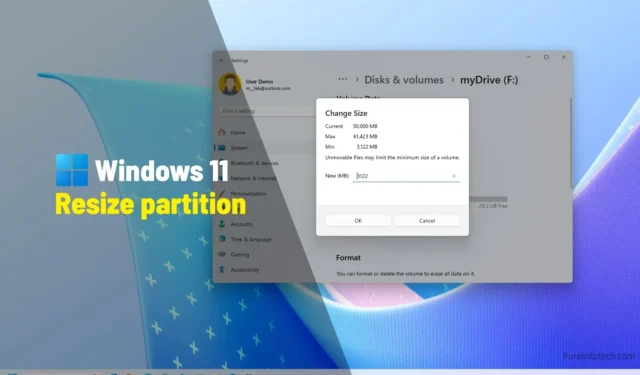
Select Change size under the “Size”section.

-
To shrink the partition, enter a lower value in the “Current” field.
-
To extend the partition, enter a value higher than the “Current” size (ensure it doesn’t exceed the “Max” value).

-
Click OK to apply the changes.
Upon completing these steps, the partition size will be adjusted without data loss. If you need to extend the primary (C:) drive, be aware that you may need to delete and recreate the Recovery Partition before resizing the main drive.
Changing Partition Size Using Disk Management
The Disk Management tool presents a straightforward method for altering partition sizes in Windows 11.
To Shrink a Partition:
Here’s how to resize a partition down in Windows 11 using Disk Management:
-
Open Start.
-
Type Create and format hard disk partitions, then click the first result to launch the Disk Management console.
-
Right-click on the drive you want to resize and choose Shrink Volume.

-
Specify the amount of space (in megabytes) to shrink the partition.
 Quick note: As you adjust the desired size, you can see the total amount of unallocated space post-shrink.
 -
Click the Shrink button to finalize the adjustment.
After these actions, your partition will shrink to the new specified size.
To Extend a Partition:
To resize a partition upwards in size, do the following:
-
Open Start.
-
Search for Create and format hard disk partitions again, and open the Disk Management console.
-
Right-click the partition you want to enlarge and select Extend Volume.

-
Press the Next button.
-
Select the disk with the available space.
Quick note: You may need to add available space from the “Available”section before proceeding. -
Confirm the size adjustment (if necessary).

-
Click Next followed by Finish.
Your drive should now be successfully extended to the desired size. Keep in mind that if the “Extend volume” option is greyed out, it likely means there isn’t contiguous space available for the adjustment.
Managing Partition Size with Command Prompt
You can efficiently modify partition sizes via the Command Prompt using the DiskPart tool.
Shrinking a Partition:
Here are the steps to shrink a partition using Command Prompt:
-
Open Start.
-
Search for Command Prompt, right-click, and select Run as administrator.
-
Start DiskPart by entering the command:
diskpart -
List the volumes with:
list volume -
Select the partition you wish to shrink:
select volume 2Replace “2” with the appropriate volume number.
-
Determine how much space you can shrink:
shrink querymax -
Now shrink the partition by entering the desired MB:
shrink desired=7099
Ensure to change “7099”to your preferred value.
-
(Optional) To reduce to the maximum reclaimable space:
shrink
Once completed, DiskPart will adjust the partition size accordingly.
To Extend a Partition:
To increase a partition’s size using DiskPart, follow these steps:
-
Open Start.
-
As before, open the Command Prompt as an administrator.
-
Type:
diskpart -
List the disks:
list diskQuick note: Use this to identify the partition you plan to increase. -
Next, list the volumes:
list volume -
Select the volume for expansion:
select volume 2Remember to change “2” to your volume’s number.
-
Finally, increase the partition size:
extend size=20480Replace “20480” with your intended increase size.
-
(Optional) To expand the partition to take all contiguous space:
extend
Post these steps, expect your partition to be enlarged effectively.
Using PowerShell to Change Partition Sizes
PowerShell is another efficient way to manage partition sizes in Windows 11.
Shrinking a Partition:
To resize a partition downwards using PowerShell, proceed as follows:
-
Open Start.
-
Search for PowerShell, right-click it, and choose Run as administrator.
-
To see all drives, execute:
Get-Disk -
To find the partitions on your drive:
Get-Partition -DiskNumber 2Adjust “2” based on your target disk.
-
(Optional) Check the supported sizing:
Get-PartitionSupportedSize -DiskNumber 2 -PartitionNumber 2Change the disk and partition numbers accordingly.
-
Resize the partition to 5GB:
Resize-Partition -DiskNumber 2 -PartitionNumber 2 -Size (5GB)")
After executing these commands, PowerShell will have successfully shrunk the partition, providing unallocated space for new volumes.
To Extend a Partition:
To enlarge a partition via PowerShell, follow this method:
-
Open Start.
-
Launch PowerShell with administratorial privileges.
-
Again, type:
Get-Disk -
List the partitions:
Get-Partition -DiskNumber 2 -
(Optional) For supported sizes:
Get-PartitionSupportedSize -DiskNumber 2 -PartitionNumber 2 -
Increase the size to 9GB:
Resize-Partition -DiskNumber 2 -PartitionNumber 2 -Size (9GB)")
-
(Optional) To extend the partition to its maximum:
Resize-Partition -DiskNumber 1 -PartitionNumber 2 -Size 10720624128
Upon completing these steps, your partition will seamlessly utilize the new size or tap into available contiguous space.
It is essential to understand the distinction between partitions and volumes. A partition is a logical division within a physical drive, allowing multiple sections of data storage, including multiple operating systems, if desired. Meanwhile, a volume refers to a formatted storage area recognized by the operating system. Each volume can correspond to a single partition or span across several.
In summary: – A drive is your physical storage device.– A partition organizes that storage.– A volume enables usable storage space with a file system.
Update March 24, 2025: This guide has been refined and updated to reflect the most accurate processes available.
Frequently Asked Questions
1. Can I resize a partition without losing data?
Yes, both shrinking and extending a partition can be done on Windows 11 without losing any files, especially when using the provided tools such as Settings, Disk Management, Command Prompt, or PowerShell.
2. What if the “Extend Volume” option is greyed out?
If “Extend Volume”is unavailable, it usually indicates that there is no contiguous unallocated space next to the partition you want to extend. You may need to create unallocated space first.
3. Is it safe to resize my system (C:) drive?
It is generally safe to resize your system drive, but it’s recommended to back up important data beforehand. Also, some actions may require deleting specific partitions, like the Recovery Partition, prior to resizing.
Related Articles:

Ranking the Top 5 Armors for Yasuke in Assassin’s Creed Shadows
16:40
Utilizing ‘Click to Do’ for AI-Driven Actions on Text and Images in Windows 11
15:44
Transform Your Photos into Artwork Using the Restyle Image Feature in Windows 11 Photos App
15:43
Leave a Reply ▼