
Facing issues while upgrading or installing Windows 11 is a common frustration among users. These problems may arise due to various factors including custom configurations and compatibility issues with hardware or software. Additionally, some glitches could stem from inherent bugs in the new operating system or its features.
It’s particularly delicate when upgrading from older versions of Windows, such as 10, 8.1, or 7. The potential for installation failures increases with older hardware, often lacking support for the latest features. Opting for an in-place upgrade instead of a clean install may also compound these complications.
If you’re experiencing difficulties during the installation of Windows 11, fear not—there are several troubleshooting steps you can take to resolve these common installation errors.
This guide is designed to equip you with comprehensive strategies to tackle the most frequently encountered installation problems in Windows 11.
Resolving Windows 11 Installation Errors
Errors during Windows 11 installation can be vexing. No matter your technical expertise, you can resolve these issues by following targeted troubleshooting steps based on the specific error encountered.
- 1. Address Device Driver Issues
- 2. Resolve Update Download Problems
- 3. Address Application Compatibility Problems
- 4. Troubleshoot Storage Issues
- 5. Resolve Hardware Compatibility Errors
- 6. Analyze Upgrade Logs with SetupDiag
1. Address Device Driver Issues
Device driver problems during the installation of Windows 11 can stem from several sources. These could be due to outdated drivers or compatibility issues between versions of Windows.
1.1 Handling Error 0xC1900101
Error code 0xC1900101, including its variants (like 0xC1900101 – 0x2000C), usually indicates driver-related issues. It is crucial to ensure that your hard drive has at least 20GB of available space for a successful upgrade.
1.1.1 Free Up Disk Space
Consider freeing disk space on your current Windows 11 setup. If you’re using Windows 10, following a similar process will help.
To clear temporary files and free up disk space:
- Open Settings.
- Navigate to System.
- Click on the Storage option on the right panel.
- Select Temporary files under the “Local Disk” section.
- Select the temporary files you wish to delete.
- Click the Remove files button.

Upon completion, unnecessary temporary files will be removed, aiding in resolving space-related installation issues.
1.1.2 Install System Updates
Make sure your system is equipped with the latest updates, as missing updates can lead to installation problems. Here’s how to check and install updates manually:
- Open Settings.
- Click on Windows Update.
- Enable the toggle for “Get the latest updates as soon as they’re available” (optional).
- Click the Check for updates button.
- Download and install any pending updates.
- Restart your computer if prompted.

This process will ensure that your system and drivers are up-to-date, allowing for a smoother upgrade process.
1.1.3 Update Device Drivers
If a specific driver isn’t found through Windows Update, you may need to download and install it directly from the manufacturer’s website. Check for yellow warning signs in Device Manager to identify problematic drivers.
To manually update drivers:
- Open Device Manager.
- Right-click on the device with the missing driver and select Update driver.
- Choose “Browse my computer for drivers”.
- Locate the folder containing driver files and select it.
- Make sure to check Include subfolders.
- Click Next and follow the prompts.

Once completed, a restart may be advisable before attempting the Windows installation again.
1.1.4 Remove Conflicting Applications
Third-party security applications can complicate installations. If you’re using antivirus software other than Microsoft Defender, consider uninstalling it before proceeding with the upgrade.
To uninstall such an application:
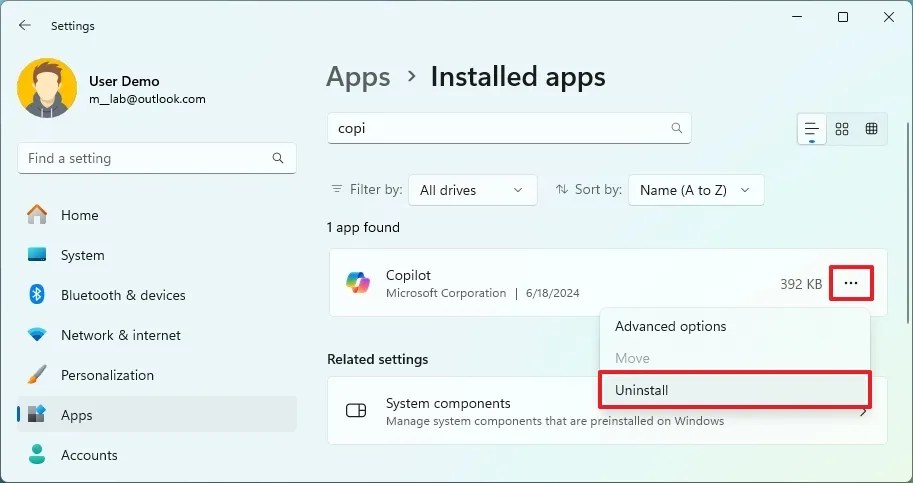
- Open Settings.
- Click on Apps.
- Select Installed apps.
- Find the application and click the three-dot menu, then choose “Uninstall”.
- Confirm the uninstallation prompt.

Removing conflicting applications will help facilitate a smoother installation process of Windows 11.
1.1.5 Use DISM and SFC Tools
Error codes related to the 0xC1900101 series may hint at missing or corrupted files. You can remedy this by leveraging the DISM and SFC command-line utilities.
To apply these remedies:
- Open Command Prompt as administrator.
- Enter the command
dism /Online /Cleanup-image /Restorehealthand hit Enter. - Then type
SFC /scannowand press Enter again. - Optionally, you can run
chkdsk /f c:to check for drive errors. - After completing, reboot the system.

This process repairs the system files and corrects any logical or physical storage errors, thereby addressing potential driver issues.
1.2 Handling Error 0x800F0923
1.2.1 Remove Incompatible Applications
Follow these steps to uninstall:
- Open Settings.
- Click and navigate to Apps.
- Select Installed apps.
- Choose the problematic app and click the three-dot menu, then click “Uninstall”.
- Confirm the actions that follow.
This will successfully remove the application that is causing installation issues.
1.2.2 Remove Incompatible Drivers
To remove problematic drivers, follow these quick steps:
- Open Device Manager.
- Locate the device with the issue, right-click, and select Uninstall device.
- Optionally check the box for “Delete the driver software for this device” before hitting Uninstall.

This will remove incompatible drivers from your system.
2. Resolve Update Download Problems
If you’re attempting to upgrade via Windows Update, various error messages may appear, such as 0xc1900223 or 0x80073712, signaling download or configuration issues.
2.1 Fix Error 0xc1900223
This error indicates a failure in downloading or installing a particular update and does not have specific troubleshooting steps—waiting and retrying can often help.
2.2 Fix Error 0x80073712
This error, similar to 0xC1900101, indicates resultant system files might be missing. Use the DISM and SFC commands outlined previously to fix the issue.
2.3 Fix Error 0x800F0922
The 0x800F0922 error is a result of connectivity issues with Microsoft servers. This often occurs when connected to a VPN, so disconnecting from it might resolve the issue.
2.4 Resolve General Error Messages
Encountering messages like “We couldn’t complete the updates” indicates a problem, but doesn’t specify what it is. Viewing the Windows Update History will help pinpoint the exact error code, which can then be researched for solutions.
To check:
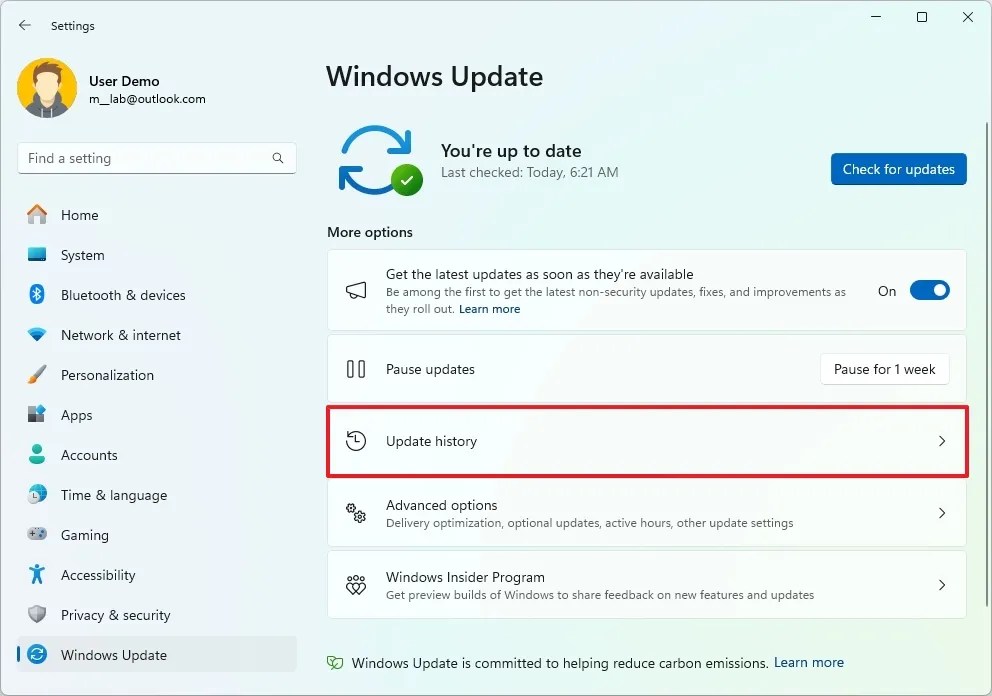
- Open Settings.
- Navigate to Windows Update.
- Click on Update history.
- Select Quality Updates.
- Identify any errors that begin with 0x to understand the issue.
This knowledge will guide you toward a specific resolution approach.
3. Address Application Compatibility Problems
Error code 0xC1900208 – 0x4000C typically reveals application incompatibilities that prevent installation. Antivirus software, particularly third-party options, might interfere. Disabling or temporarily removing them can help in performing the upgrade.
To uninstall problematic applications:
- Open Settings.
- Click on Apps.
- Navigate to Installed apps.
- Select and uninstall the application causing the issues as mentioned above.
After removing these applications, try the installation once more.
4. Troubleshoot Storage Issues
Common error codes indicating storage issues include 0x80070070 – 0x50011. Problems usually arise when there isn’t enough space available during an installation or upgrade.
Here are three effective ways to resolve this:
- Attach an external drive with at least 16GB to temporarily free up space during installation.
- Free up existing disk space by cleaning unused files as demonstrated.
- Consider performing a clean installation instead of an upgrade.
5. Resolve Hardware Compatibility Errors
Errors like 0x80300024 can indicate conflicts related to your hardware setup during installation. These issues often stem from disk space configurations or unsupported hardware.
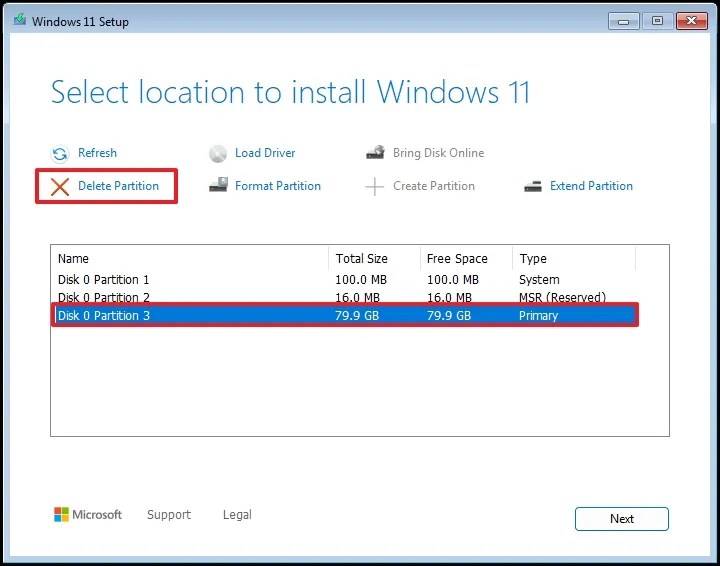
5.1 Fix Error 0x80300024
This error suggests that Windows cannot be installed in the selected location, often due either to partition configurations or drive compatibility.
To troubleshoot:
- Disconnect any other drives and ensure only the target drive is connected.
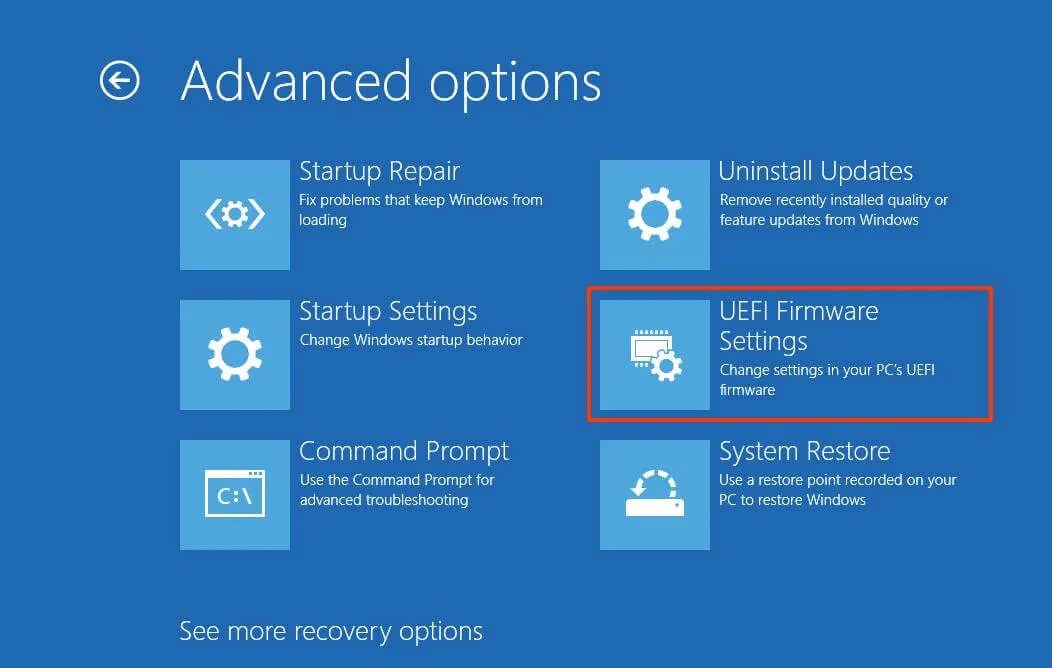
- Access BIOS/UEFI settings and change to UEFI mode if currently set to legacy.
5.1.1 Access BIOS in Windows 11
Accessing BIOS settings can help resolve partition problems. Use these steps:
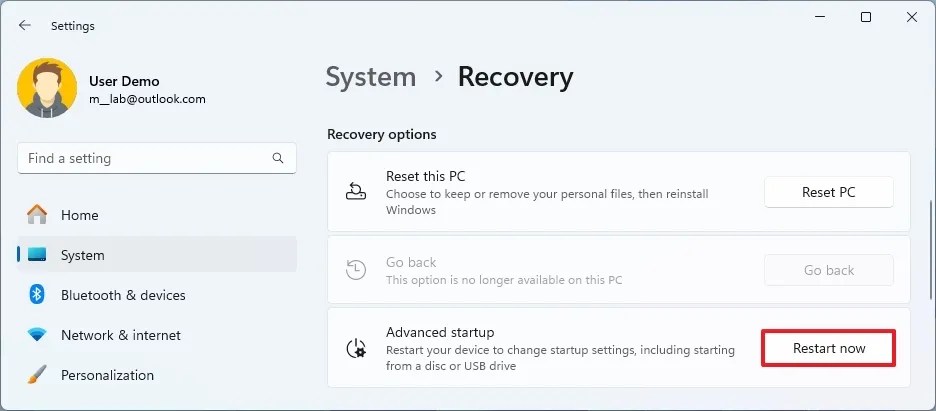
- Open Settings.
- Click on System.
- Select Recovery.
- Under “Advanced startup, ” hit the Restart now button.
5.1.2 Access BIOS in Windows 10
For Windows 10 users:
- Go to Settings.
- Navigate to Update & Security.
- Select Recovery.
- Press Restart now under “Advanced startup.”
5.2 Fix Error 0xC1900200
This error signifies that your device does not meet the minimum system requirements for Windows 11. Ensure your hardware meets these specifications:
- Processor: 1GHz or faster with two or more cores on a compatible 64-bit processor.
- Memory: 4GB RAM (16GB recommended).
- Storage: 64GB of storage (256GB SSD preferably).
- Firmware: UEFI with Secure Boot capabilities.
- TPM: TPM version 2.0 required.
- Graphics: DirectX 12 compatible graphics with WDDM 2.0 driver.
- Display: HD display (720p) greater than 9 inches diagonally.
5.2.1 Enable TPM and Secure Boot
To enable TPM and Secure Boot within UEFI settings:
- Follow previous steps to Access BIOS.
- Find and enable TPM and Secure Boot settings (if applicable).
5.3 Troubleshoot Setup Issues
Errors such as 0x8007042B 0x4000D may arise due to another application running in the background, blocking the installation.
5.3.1 Terminate Conflicting Processes
To end running processes that might interfere with installation:
- Open Task Manager.
- Select the Processes tab.
- Highlight the application and click on the End task button.

5.3.2 Uninstall Applications in Windows 11
To remove applications in Windows 11, repeat the previous uninstall steps.
5.3.3 Uninstall Applications in Windows 10
Follow the steps for Windows 10 to remove applications that might hinder the installation.
6. Analyze Upgrade Logs with SetupDiag
For users upgrading to a new version, the SetupDiag diagnostic tool can help identify the root cause of installation failures.
SetupDiag examines logs created throughout the upgrade process to provide insights into issues such as hardware incompatibilities, software conflicts, and corrupted files.
To utilize SetupDiag:
- Access the SetupDiag download page.
- Download the latest version by selecting the appropriate link.
- Choose a location like the “Downloads” folder for saving files.
- Open Command Prompt as administrator.
- Run the command to navigate to where SetupDiag was downloaded:
cd %USERPROFILE%\Downloads\SetupDiag. Adjust if necessary. - Run SetupDiag:
SetupDiag.exe /Output:%USERPROFILE%\Downloads\SetupDiag\SetupDiagResults.log.
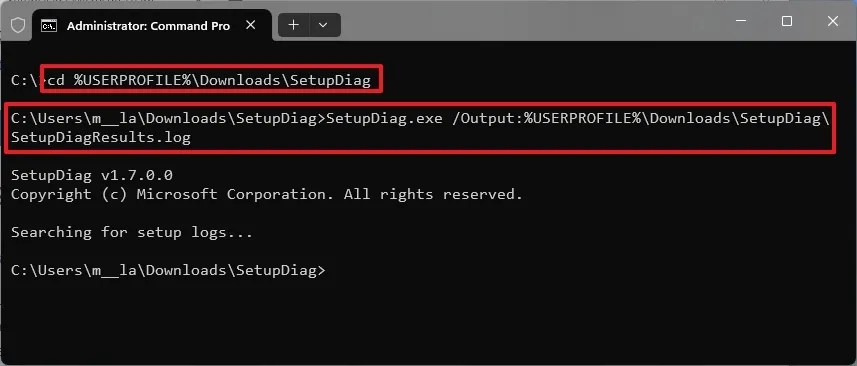
Open the resulting SetupDiagResults.log file, review the information regarding your system specifications, and identify any recorded error codes that may require further troubleshooting.
If you’ve successfully resolved your installation issue, we’d love to know how you did it. Do you have additional questions? Share your thoughts in the comments!
Additional Insights
1. What are common error codes during Windows 11 installation?
Common error codes include 0xC1900101 (driver error), 0x800F0923 (incompatibility issue), and 0x80070070 (insufficient storage).Each code can indicate specific underlying issues, ranging from hardware incompatibilities to problems with installed apps.
2. Can third-party antivirus software interfere with the installation?
Yes, third-party antivirus programs often lead to various installation errors by blocking necessary processes. It’s recommended to uninstall or disable such software before proceeding with the Windows 11 upgrade.
3. How can I check if my PC meets Windows 11 requirements?
You can verify if your PC meets Windows 11 requirements by checking the specifications under Settings > System > About for RAM, processor, and system firmware details. Additionally, Microsoft offers a PC Health Check tool to assess compatibility.
Related Articles:

Top Trainers for First Berserker Khazan: Installation Guide and Recommendations
2:31
New AI Features Introduced in Windows 11 Builds 26200.5551 and 26120.3863 for Dev and Beta Channels
15:44
Windows 11 May 2025 Update: Copilot+ PC Recall Now Available
14:43
Leave a Reply ▼