Revamping the Windows 11 Start Menu: What’s New?
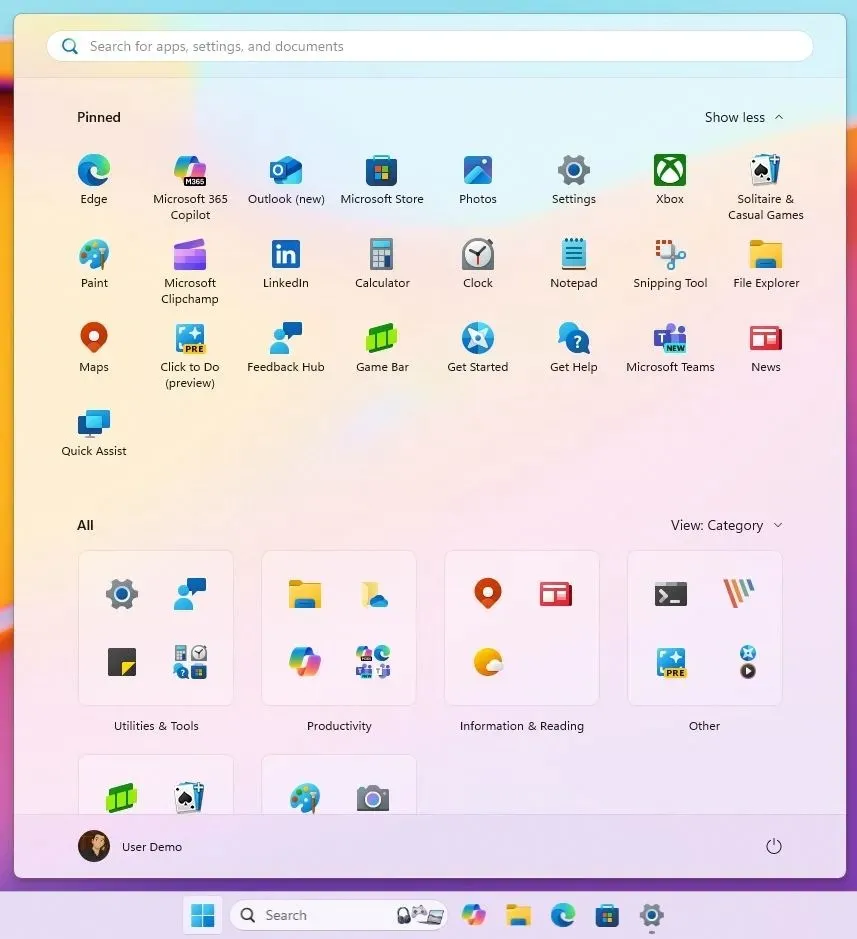
Microsoft is set to transform the Start menu in Windows 11, ushering in a fresh, consolidated design that merges the “All” applications menu with the “Pinned” section into a more expansive, scrollable interface. Best of all, you’ll finally have the option to deactivate the “Recommended” section, though the method to do so may not be immediately apparent. Let’s delve into the innovative features and customization options that await you in the new Start menu.
A Closer Look at the New Start Menu Design
The revamped Start menu showcases a wider layout that accommodates:
- Up to eight pinned applications per row.
- Three app and file suggestions at a time.
- A maximum of eight applications or four groups side by side.

The “Pinned” section conveniently hosts two rows of pinned applications. If you wish to pin even more apps, simply look out for the option to expand to view them all.

To keep every pinned app visible, enable the “Show all pins by default” option within the “Start” settings.
Changes to the Recommended Section
While the “Recommended” section is largely unchanged, it now boasts a capacity for displaying six files or applications using two rows. When prompted, clicking the “Show more” button will direct you to an additional page listing all recently accessed files.

Now, users can deactivate the “Recommended” section altogether by toggling off the “Show recommended files in Start, recent files in File Explorer, and items in Jump Lists” switch in the “Start” settings.

Introducing the All Section
The arrival of the “All” section is noteworthy, as it eliminates the need to switch pages to access all installed applications. This section allows you to view apps in different layouts – grid, list, or categorized views – enhancing user experience significantly.

Microsoft has also refreshed the “Start” settings page. There’s no longer a need for layout modifications since options to see either two rows by default or all pinned applications are readily available now.

Although the customization options for pinning applications have improved, other settings remain unchanged, maintaining a balance between innovation and familiarity.

While the exact release date for this revamped design is still under wraps, it’s evident that Microsoft continues to iron out existing issues, notably how the new layout aligns with the Windows Search interface. Enhancing the transition from the Start menu to Search remains a priority. A possible solution could resemble Windows 7 and Vista where results appeared directly in the Start menu.
How to Enable the New Start Menu Using ViveTool
The innovative Start menu is currently accessible in the Dev and Beta Channels for Windows 11 builds 26200.5518 and 26120.3671, part of the 24H2 version. Here’s how you can activate it manually using ViveTool:
- Navigate to the GitHub page.
- Download the ViveTool-vx.x.x.zip file.
- Open the downloaded zip using File Explorer.
- Select Extract all.
- Click Extract to unzip the contents.
- Copy the path to the new folder.
- Launch the Start menu.
- Search for Command Prompt, right-click, and select Run as administrator.
- Input the following command to navigate to your ViveTool folder, then press Enter:
- Next, enable the new Start menu by typing:
- Finally, restart your computer.
cd c:\folder\path\ViveTool-v0.x.x
Remember to replace the path with the accurate folder path on your system.
vivetool /enable /id:49402389, 49221331, 47205210, 48433719
Upon completing these steps, the new Start menu design will be active on your system. To revert to the previous design, follow the same instructions, but for step ten, enter:
vivetool /disable /id:49402389, 49221331, 47205210, 48433719
Frequently Asked Questions
1. When will the new Windows 11 Start menu be officially released?
While Microsoft has not confirmed an exact release date, the new Start menu is currently available in the Dev and Beta Channels, indicating a rollout may be imminent for wider audiences.
2. Is it possible to revert back to the old Start menu after upgrading?
Yes, you can easily revert to the old Start menu by using ViveTool and executing the disable command provided in the activation steps.
3. What are the main features of the new Start menu?
The new Start menu features a wider design, allowing for up to eight pinned apps, an enhanced Recommended section, and the introduction of an “All” section that displays all apps without switching pages.


Leave a Reply ▼